Deploying Your App on the Thriftly Server
Note
Before you start this step, you must migrate the application that contains your Thriftly APIs to your Thriftly Deployment machine, using whatever internal deployment methods your organization uses to migrate applications. You’ll be accessing your application and deploying it on the Thriftly Server in the steps below.
To deploy an application on the Thriftly Server:
From the Windows Start menu, select Thriftly Deployment Server > Thriftly Admin. The Thriftly Configurator window appears.
Select the New Application button to begin adding your application to the Thriftly Server. The NewApplication form appears.
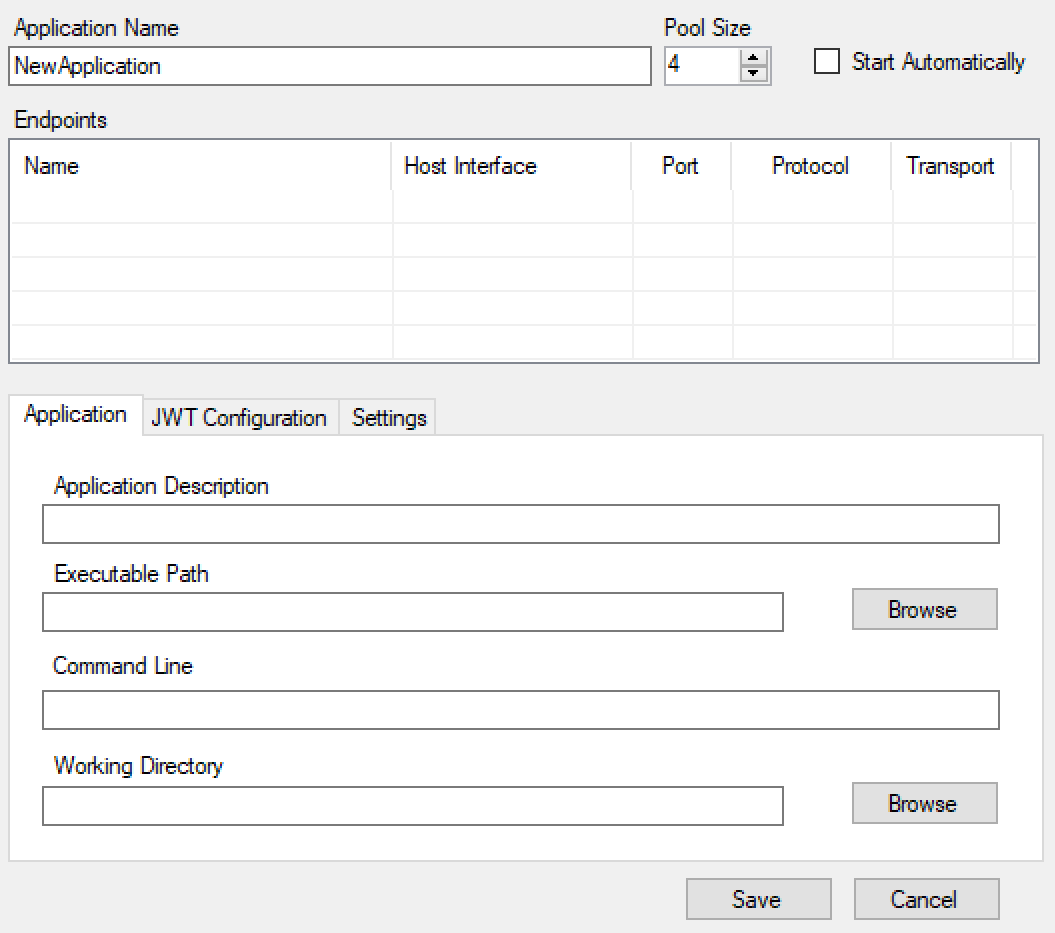
Within the NewApplication form, fill out the following fields:
In the Application Name field, enter a name for your application.
In the Pool Size field, enter the number of copies of your application to start using Thriftly. The more copies you start, the faster the APIs within your application will handle requests and responses. Note that your application’s maximum pool size is limited by your Thriftly subscription.
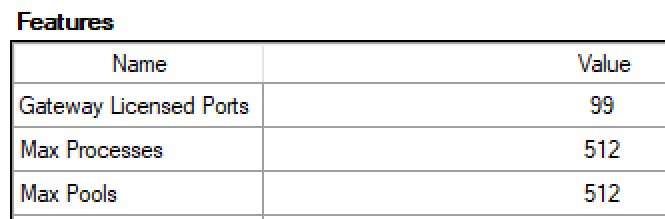
If you need to know how many application pools you have access to, select the Options button from the Thriftly Configurator toolbar, go to the About tab, and look at the Max Pools entry.
If you want Thriftly to automatically start your application (and make your APIs available over the Thriftly Server and Gateway) when you launch the Thriftly Configurator, select the Start Automatically checkbox. Otherwise, leave the checkbox unselected. We recommend selecting this checkbox, to save you a step when starting your Thriftly APIs.
On the form’s Application tab:
In the Application Description field, enter a description for your application.
Select the Browse button next to the Executable Path field. Browse to your application’s executable file and select it. If you’re not sure where your application’s executable file is located, contact your application developers for assistance in locating your app’s executable file.
For Java applications, you should always select the Thriftly.Java.Invoker.exe file that came included with your Thriftly Deployment installation, instead of your application’s executable file. If you accepted our default installation location, this file’s located at
C:\Program Files\Thriftly Deployment Server\bin\Thriftly.Java.Invoker.exe. In the next step, you’ll configure Thriftly.Java.Inovker.exe to find your application and connect it to the Thriftly Server.
In the Command Line field, enter any command line arguments necessary to run your application.
For Java applications, you must enter the arguments that Thriftly.Java.Invoker.exe needs to find and run your application. These include:
/Class.Path: In this parameter, enter the path(s) to your application’s bin folder and each of its external Jars.
/Library.Path: In this parameter, enter the path(s) to the native libraries (DLLs) your application uses. For example, you might enter your application’s bin folder and the folder containing its external Jars in this parameter.
/main: In this parameter, enter the name of your application’s Main class.
/Xms: (Optional) In this parameter, enter the initial/minimum memory allocation to provide for your application. By default, Thriftly allocates 64MB of initial/minimum memory.
/Xmx: (Optional) In this parameter, enter the maximum memory allocation to allow for your application. By default, Thriftly allows a maximum memory allocation of 128MB.
If your application’s working directory is not the same as the directory listed in its executable path, select the Browse button next to the Working Directory field. Browse to and select your application’s working directory.
Switch from the Application tab to the Settings tab. Fill out the following fields as necessary:
In the String Encoding field, select how Thriftly encodes requests to and responses from your application. In most cases, you should select UTF-8 to provide standard Unicode encoding. If you are deploying a DataFlex application, however, you must select ANSI (as DataFlex does not support UTF-8 encoding).
In most cases, we recommend you leave the Localize DateTime checkbox selected, so Thriftly converts calls to your application’s APIs into your application’s local time and sends responses back in UTC format. This alleviates potential confusion if, for example, your API receives a request from an application located outside your time zone. If you are performing time zone related testing, or the application(s) making calls to your APIs doesn’t accept UTC-format datetimes, you might want to clear this checkbox.
In the Process panel, you can define the recovery settings the Thriftly Server uses to reconnect to your application if the connection between the two is interrupted. We recommend leaving these settings as they are by default.
Select the Save button to save your application.
At this point, the Add Endpoint button becomes enabled in the Thriftly Configurator toolbar. We’ll now move on to adding an endpoint (the actual web address at which your developers will be able to access your Thriftly APIs) for your application using the instructions in the Adding Endpoints section.